Sir Isaac Murphy's dictionary explains the term "Idiosyncrasies" as originating from the frequently lost language of the Wutdahekhapun clan (pronounced "What-The-HeckHappened") in which pagan words were devised and used to explain those otherwise unexplainable human phenomenon. Broken into its respective parts, "idio" is an abbreviated form of the word that defines how the human feels about himself when he has been presented with more frustrating problems than he has immediate solutions for, especially if the problems are to equipment he has been using for years. "Syncrasies" are those frustrating little problems which are unique to your equipment, and which occur as a direct result of human mistakes in such a way that they prevent you from immediately identifying and solving the problem (meaning you ain't had to fixed this mistake before) without having to read something first (because you already know that the exact answer to your exact question ain't in the book) or listening to what someone has to say (and let them know you don't know!).
Unless something obvious has happened like flooding the camera or strobe, or closing the camera case with the flash cable hanging outside, or forgetting to put good batteries into the strobe and camera (Come on, you can't put batteries into a Nikonos III! I know better than that!), if you have ever had the problem of the flash not flashing, remember asking yourself if the problem could be with the flash, the flash cable, or is it the camera?
So, what did you do? After wiggling the flash cable and clicking your camera, checking for water leakage and even shorting across the contacts of the flash cable to force-fire the flash, you finally grabbed someone else's flash that worked with their camera, attached it to your camera, and saw if it worked on your camera. If his flash worked, then your flash was "kaput". But, if his flash still didn't fire, then you realized that your camera had a camera-to-flash synch problem somewhere. But what you probably didn't realize is that many camera-to-flash communication problems are caused by simple little Nikonos III "idiosyncrasies."
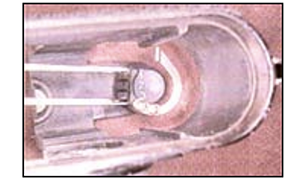
Top of PageThe 3 flash FINGERS inside the outer casing [#1, common or ground; #2, flash bulb; #3, all electronic flashes (photo 1)], are respectively assembled to the 3 thin flash PINS of the flash port. These fingers and pins are completely encased in a molded plastic assembly. Each of the 3 fingers are made of spring steel and designed to spring DIRECTLY forward to make individual contact respectively with each of the 3 flash contact NUTS located on the lower part of the film canister side of the camera's "guts" (photo 2). Note: From now on we will be talking about fingers, pins and nuts. So, don't go NUTS!

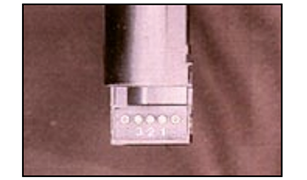
The purpose of the 3 pins is obvious: to connect the flash cable. But the purpose for the flash fingers and nuts is to eliminate the old conventional need of constructing a hardwired wiring harness to provide communication between the camera's flash synch mechanics and the flash connector. Instead, the flash fingers provide a "break away" electrical flash connection so that the camera's mechanical "guts" can be removed easily and safely for film changing, a requirement unique to the Nikonos III in comparison to its land camera counterparts.
Top of PageHave you twisted the flash pin assembly of the camera and misaligned the 3 flash fingers with the 3 nuts (photo 1) due to your over tightening of the cable connector to the camera (the Great-Ape technique), or that you left the connector installed to the camera for the whole week and the salt water cemented the two piece connector into a one piece unit, and when you unscrewed it, everything twisted? (Dumb, very dumb. And I bet your cable is messed up, too!) And/or have the flash fingers been broken, but you can't see anything wrong with them?
Then remove the camera's "guts" and connect a strobe that you KNOW is working good to the outer casing. Next, using a metal coat hanger which has been cut and bent so as to make a very long pair of tweezers (or use pair of very long needle nose pliers, being careful not to scratch the casing's O-ring seating mouth), touch the side of the flash fingers #1 & #3 at the same time. (Note: If the coat hanger is painted, then scrape away some of the paint at the tips to make better electrical contact) The electronic flash should flash. If it does fire, then check the alignment of the flash assembly and realign it, if necessary, carefully with a pair of needle nose pliers so that the fingers point EXACTLY to the opposite end of the casing.
If it doesn't flash, and you are absolutely certain that both the strobe and its cable are in good working order, then most likely the camera's flash connector assembly is definitely damaged. But perform the following procedures just to be sure. Otherwise, the problem must be repaired professionally, and unfortunately that means that you will have to wait until you got back home.
Top of PageIf the flash don't flash, remember that grease prevents electrical contact. And since we all must handle the camera's "guts" just to change film, etc,. it's easy for our O-ring greasy fingers, even just our naturally oily fingers, to coat the nuts, and in turn, the flash fingers and mess up electrical things.
Solution: Inspect the 3 nuts with your 35mm magnifier for signs of grease, clean these nut contacts with a cotton swab, and clean the face of the 3 flash fingers with a swab also. Then try the camera/strobe communication again.
NOTE: The nuts have very sharp notches cut into them and will cause extensive fraying of the cotton swab. So, be sure all of the fuzz is removed from the nuts before using the camera.
Top of Page"My flash fires with the "paper clip" test, alignment is correct, but won't fire when I put the "guts" back into the casing." Then try this next.
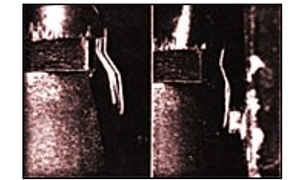
Remember from the above that each of the 3 fingers are constructed of a thin piece of spring steel. And each of these 3 fingers must retain their original springiness (photo 3-a) over the entire life of the camera so that flash contact communication is maintained (i.e., the fingers spring upwards and outwards to make a good contact with the nuts). So, over the life of the camera, as we store the camera's "guts" installed in the outer housing (photo 3-b), the 3 fingers remain constantly under tension (being pushed away from the 3 contact nuts). Is it any wonder, therefore, that there may come a time when you trigger the camera, flash attached, and the flash doesn't fire? Could it be that the spring (in the flash fingers) has sprung? (photo 4.) .Notice the shape of the tops of the 2 other flash fingers which are behind the front "properly repositioned" finger!)
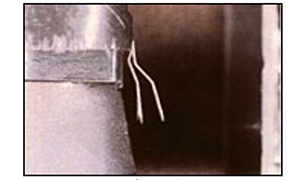
Solution: In reality, it doesn't take much weakening in the springiness of a spring contact finger to cause it to be moved from its original "operational" spring contact position to a position where it won't make a good flash contact with the camera. It also stands to reason that it wouldn't take much for you to reposition (bend back into place) the flash finger to reestablish its operational position and, thus, reestablish flash communication. The key words here are "you" and "it wouldn't take much" movement....remember this!
Now remember, what I'm about to explain to you can be overdone by you, and you can easily break the flash fingers during your attempts to reposition them. So, TAKE EVERYTHING A LITTLE AT A TIME!
Run your index finger into the outer casing through the lens mount hole, not down from the top of the casing! Place your finger tip or finger nail up under a flash finger (Flash Fingers #1 & #3 are the ones of importance, but do them one at a time, please!), and lift upwards and outwards LIGHTLY, VERY LITTLE, SLIGHTLY, SLOWLY, EASILY, JUST A LITTLE BIT, pick what ever word you want to use so long as you remember to be CAREFUL and take the re-bending a little at a time. (See photo 4 again and notice the repositioned finger relative to the other 2 "still bent" fingers)
Make a slight bend to each flash finger, reinstall the "guts" and fire the trigger and see if the flash goes off. If not, try bending the fingers one more time by just a little more! Still nothing, then this is not the problem and you need professional servicing. Sounds like the problem is up inside the camera's "guts" and you can't fix this in the field yourself!
Top of PageIf you are sure that the strobe and cable are good and that all of the above have failed, but you just got to know for yourself where the problem is, try the following. Using a VOM (volt ohm meter), place the meter on resistance (ohms), and connect one lead to each of the outside #1 & #3 nut contacts of the camera's "guts" (photo 2). With the trigger cocked, the meter must read infinity. Next, shutter speed on any setting but "R", trigger the trigger and the shutter should move. Now, while continuing to hold the trigger in, the meter should read 0.00 (if you also have a buzzer on the VOM, it should be sounding). Then, as you begin to release the trigger, the buzzer should stop (reading should go back to infinity). If none of these work as explained, you and your pocket have got serious problems which will require professional help.
Top of PageA common photography complaint, granted. But unless you have completely narc'ed out and have lost all of your photographic smarts pertaining to the settings of the camera/lens/strobe/distance, then you just may be able to blame those crummy pictures you got on camera failure!
As mentioned above, the flash assembly in the outer casing can become twisted and no longer aligned within the casing. This misalignment can also cause the 3 fingers to now bridge the narrow gaps between the three nuts of the camera. Depending on how you twisted the assembly, either finger #3 touches nuts #3 & 2, or visa versa, finger #2 touches nuts #2 & 3. So now, when you trigger the camera, the flash goes off; but the flash fires synched with the "flash bulb" timing for the camera instead of the "electronic strobe" timing of the camera!
How does this happen? Remember, a Nikonos III was the last of the Nikonos cameras to provide for flash bulb use, and therefore had to provide a synch for firing a flash bulb. But to fire a bulb in "synch" with the opening of the camera's shutter, this requires that the bulb's ignition be started before the shutter actually opened so that the bulb's light output could reach its peak when the shutters finally did open. Thus, the camera provided a separate series of contact points for bulb and for electronic flash use, and the closing of both contact points are made during every triggering of the camera!
Since you have twisted its flash assembly so much, the "electronic strobe" finger is now able to be fired from the SHARED point-closing signal of that intended for "flash bulb". The result is that the strobe goes off before the shutter is opened, and when the shutter finally opens, there ain't no light for the film to see!
Solution: Like above, straighten the alignment of the flash assembly
Top of Page"I clean my camera all of the time and I always spray it down with a can of aerosol lubricant to prevent corrosion. But lately, all of my pictures have been coming out black. What's wrong?"
The number one task all photographers perform is to clean and grease O-rings before they load the camera with film. Of course! You don't want the film to fall out of the camera while installing the greasy O-rings and run the risk of getting the film ruined by grease.
Now, the moment of truth. Completely cleaning the grease off of your fingers before loading the film. After cleaning your fingers in the usual way you have always done, you proceed to pull out the film from the canister and lay the film across the shutter area (from left to right) of the camera, and so on until the film has been securely loaded into the camera (you know the steps).
But what you don't realize is that some time, sooner or later, you will have not gotten all of the grease off of your fingers, and as you are laying the film across the shutter area, your greasy finger will touch the shutter blade and will leave a "grease filled" finger print.
Top of Page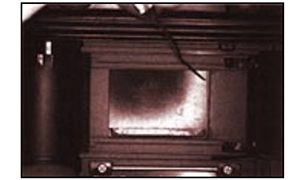
Wipe it off, you say! Not possible, I say! Since the shutter blades extend back behind the shutter frame, you can't get ALL of the grease off. In fact, as you try to wipe off the grease, you typically smear the grease right in between the two shutter blades (photo 5). And because the shutter blades are designed to ride one on top of the other, the grease you forced (cleaned) in between the blades and will literally "glue" the two shutter blades together. So, if the two shutter blades do not operate independently, they never fully "open" to expose the film. Therefore, totally black (or partially black) pictures.
SOLUTION: Money out of your pocket to have a professional tear down the whole camera and clean off the grease piece by piece. And don't decide to use alcohol to clean the shutters: this will just dissolve the grease and then carry it everywhere inside the camera, and a technician will be allowed to charge you more for the cleanup of your cleanup!
"O.K., I now understand about a little bit of accidental grease and how will cause the shutters to stick together and give me black pictures. But what about using aerosol cans of spray lubricants?"
Lubricants, oils, greases, call them what you want. But around shutters of any camera, call them "DAMAGE". Even if you are just in the same room as your camera and you are spraying your other diving equipment (for some reason!), sprays (the mist) will travel through the air and get into the shutters of the camera, EVEN ACROSS THE ROOM.
Don't believe this can happen? Then think of bug spray you sprayed in the kitchen, and a few minutes later you can smell it in the living room. It didn't crawl in with the bugs: it was carried by the flow of air through the room! So, if someone is using any aerosol (including hair spray, deodorant, etc.), be sure the camera is closed and the lens is on it. Don't open the camera in that room for at least 15 minutes: better yet, go to another room if you need to open the camera for any reason.
Solution: Same as above. Some technician will put an oil well on your camera and pump money out of your pocket.
Top of PageSimple! Turn the shutter speed dial to "B" and as you are watching the shutter blades, fire the camera. If the first curtain VERY SLOWLY travels upwards (instead of traveling fast and crisp), then the shutter blades have been "glued" together, hopefully only with grease or oil! Regardless, you can't fix the problem yourself, so don't even try. Professional servicing is required!
You probably didn't realize it, but all the tools necessary to perform quality shutter speed evaluation and testing as well as and accurate flash synchronization testing is right there in your camera bag. It's your actual camera and your actual electronic strobe, AND A LITTLE KNOWLEDGE. If you went out and bought specialized shutter and flash testers, the price would be more than $500.00, and the testers still wouldn't test how well the equipment would work together!
Top of PageFirst, take of piece of white paper (use standard paper, not thick like a business card), tear it so that it's size is a little taller than a piece of film (top to bottom) and a little longer (side to side). Next, take the camera's "guts" out of the casing, and load the "piece of paper film" so that it fully covers the rectangular hole, but does not extend so far over as to tough (and interfere with) the film sprocket and that it does not buckle up when the film plate is closed. (For those of you who would rather spend hours measuring the camera and then cutting a piece of paper to EXACTLY fit, go for it! Just remember, I will have already tested my camera/strobe combo, and will be on my second cold one by the time you get finished!)
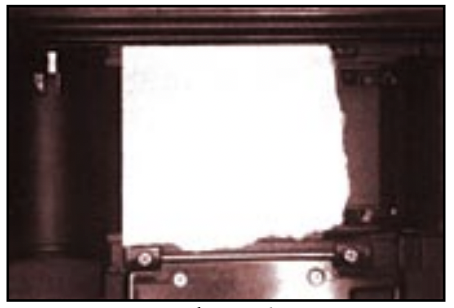
Now, reinstall the "guts" back into the outer casing, and connect the flash cable. Leave off the lens, and have the strobe turned off for right now!
Turn the shutter speed dial to "B". Now, while triggering the trigger (and holding it in so that the shutter stays open), place a pencil or pen inside the shutter frame and trace the lower and upper edges onto the white "film" paper. Then, draw 2 arrow head lines, each bringing in the center and terminating at one of the frame lines (these lines are only so that your eye will be able to quickly find a reference point to follow up or down to locate the trace lines). Now, you have made a film plane mask, and have calibrated it to the exact dimensions of your camera and the images that it will record on the film.
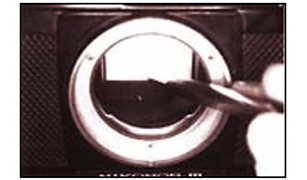
When the camera is triggered, mechanically the first shutter certain is released and is pulled upwards by a spring until it is fully out of the way of the film (see Photo 5 again). (Ever wonder where the shutter goes? Ever wonder why the height of the view finder head is as tall as it is? I think you can now figure out these two questions!) Next, the second curtain is released, pulled upwards by its spring, and contacts the bottom of the first curtain thereby closing the film plane to incoming light.
The above mechanics has just described what a "shutter speed" does. It simply controls the time when the second curtain is allowed to travel relative to the travel of the first curtain. Without control, the shutters would never open; they would always travel together. Therefore, control of shutter speeds is really the delaying the travel (closure) of the second curtain relative to the travel (opening) of first curtain.
This delayed travel is completely controlled by mechanical gears. And mechanical gears can get worn just like mechanical gears in a car's engine. So, just because the shutters move, and even if you believe you can hear the difference between slow speeds and fast ones, what may be happening may not be accurate. Worn gears usually result in shutter speeds getting faster and faster than the number on the dial!
One last important thing to remember! What you are about to read and experiment with using your equipment will seem confusing at first until you become familiar with the procedures. To confuse things even more, when you see problems on your film you believe are due to possible shutter speed error, and try the following tests to answer your questions, REMEMBER THAT YOUR FILM SAW THE PROBLEMS UP-SIDEDOWN! Therefore, a problem on the top of your picture was caused by the lower shutter, and visa versa!
You are now ready to test your shutter speeds and flash synch systems all at one time using the strobe for a shutter testing (timing) tool. But before I discuss these techniques, let me provide some additional understanding of what is about to happen.
At the completion of upward travel of the first shutter curtain (photo 5), the shutter makes contact with the electronic flash contacts (not the bulb flash contacts-this contact was made long before the shutter even opened). So, when the flash contacts touch, the circuit to fire the flash is completed and the flash will (should!) fire. While there are many reasons other than Idiosyncrasies #1 & #2 why the flash won't fire (broken wires in the flash cable, the camera, corrosion, etc.), for the purposes here I will assume that you have checked your equipment for Syncrasies #1 & #2 that your system is at least firing the strobe.
Since the strobe is supposed to fire only upon the complete opening of the first curtain, this mechanical operation can be checked by simply holding your timing light (the strobe) about one foot in front of and one foot below the lens hole and pointing up about 45 degrees into the shutter area of the camera, and I look from behind the strobe and down its side. At all shutter speed settings, the first shutter should not be seen in the field of view of the film. So, when you trigger the camera, strobe pointing up into the shutter area, when the flash fires you should see the upper line that you traced onto the white paper. If you can't see this line, then the film will see the bottom of the shutter curtain during flash photography work (and appear at the bottom edge of your picture).
The real test for accuracy of all shutter speeds is in the testing of the closing time of the second shutter. This time, you will be holding your timing light (the strobe) about one foot in front of and one foot above the lens hole, and pointed downwards at about 45 degrees into the shutter area (looking down the strobe from behind) so that when the flash fires it will be pointing towards the lower trace line you drew onto the white paper.
Top of PageAs a beginning point of familiarization of what you are about to see and realize, first set the shutter speed dial to 1/250 sec. When you fire the strobe, instead of seeing the bottom trace line, you will see that the shutter area is "blackened" by the second shutter curtain blocking about 1/2 to 2/3 of the white paper, while the only part of the white paper showing will be the upper remaining area of the shutter opening. Before you panic and think your camera is all messed up, it's not. So, keep on going.
Next, turn the shutter speed dial to 1/125 sec., and fire the strobe. This time, you will see that only about 1/4 of the lower shutter area is "blackened" (blocked); the rest is all white paper (photo 8). But you still can't see the bottom trace line you are supposed to see (and want to see), can you? Now, turn to 1/60 sec., and fire the strobe. Presto: at last you can now see the bottom trace line perfectly as well as all of the white paper.
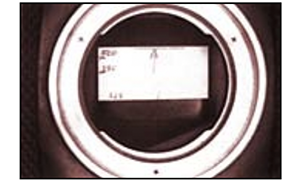
Remember, this is the fastest flash synch speed that a Nikonos III can function and record a complete picture, and you now know why. If you test the effects of 1/30 sec. with your timing light, you won't see any big changes in the shutter area. But if you use a yellow colored paper mask instead of white, and if you haven't already temporarily blinded your eyes so far from all the bright strobe light testing, then you possibly may be able to actually see a difference in 1/30 and 1/60 sec. light reflection off of the yellow paper.
While this testing is in no way intended to be an absolute measurement of precise shutter speed settings, it is a great tool to use in the field to be sure that your camera and flash are working together properly, that the flash is properly timed to fire with the complete opening of the shutter, and that the shutter speeds are working within general limits of mechanical accuracy.
After reading all this stuff and becoming familiar with the procedures, you will find that this test takes about only one minute of time from tearing a piece of paper to test completion. Or, you can put into the camera a $7.00 roll of film, go on a $40-50.00 two tank dive and take pictures, then spend $8-10.00 to have it processed just to find out that the pictures were ruined because something was wrong.
Top of PageExcluding those mistakes of water drops (and rusting of gears) which can easily fall through the counter's engaging linkage arm hole which were covered in the Winter '90 issue of Ocean Realm, "counter not counting" problems on Nikonos III cameras are a frustrating but common problem. When the camera "guts" are installed properly and fully down into the outer casing, the narrow upper shoulder of one of the metal "guides" (which is cast as part of the inside wall of the metal outer casing) should squarely push upwards on the center of the counter engagement arm to engage the counter gears. Likewise, when the camera is removed from the casing, the spring loaded arm is now free to spring itself downwards, thereby releasing the counter gears and allowing the spring loaded counter indexing wheel to return to zero (photos 1 & 2; Sir Isaac Murphy Newton Didn't Invent the Nikonos-III).
So, how does the camera get so messed up that it doesn't count? From simple human "idio's"! People who own Nikonos III's simply assume that all they have to do is just stick the camera's "guts" anywhere into the opening of the outer casing's mouth; no concern whether it is centered, no concern whether it is straight up and down with the casing. No concern because they believe that the casing will GUIDE everything properly together for them! And since this counter engaging metal "guide" is triangular in shape (narrower at the top), it's really of no use as a TRUE guide. So, what sooner or later happens is the human's unknowing but somewhat natural tendency to install the camera's "guts" like we put on shoes: just get part of our foot into the mouth of the shoe somewhere because the shoe will guide the rest of the foot into it if we wiggle the foot enough.
For a while, it will seem to the Nikonos III user that he has been doing everything properly: all operations work properly, counter included, and therefore his techniques of putting together the camera has obviously been correct. It's not until sometime later that problems show up: the counter won't begin to count until 3-5 pictures have been taken, or won't start at all. By then, what has happened is that the counter engagement arm has become so bent, and the shoulders of the guide on the outer casing so worn, that sometimes the arm can easily slide off the edge of the shoulder, and thus doesn't get pushed up to start counting.
Top of PageSolution: First, you must determine that both the counter engagement arm and the counter itself are working properly. To do this, simply guide the tip of a ball point pen up the channel and push pressure upwards onto the arm. Now, while holding upwards on the arm with the ball point pen, trigger the camera several times. You should see in the counter window that the counter wheel indexes frame number by frame number. Do so at least up to frame #5. Then release the upwards pressure applied by the pen, and the counter should return to zero. If everything works OK so far, the problem is certainly due to bent or worn parts as described above. So, read on.
Next, inspect the counter engagement arm and determine if it is extending out of and directly centered in the hole, and not bent. If bent, then use a pair of fine tip needle nose pliers and LITTLE BY LITTLE carefully bend the arm in whatever direction necessary to center the arm. Again with the ball point pen, repeat the above procedure to insure you haven't broken or over bent something and that everything is still freely working.
Re-seat the "guts" into the outer casing and see if you "fixed" the counter's counting by triggering the camera. If it still doesn't count, then the shoulder on the inside of the outer casing is mostly likely very worn. Just remember that even though the counter doesn't count, this doesn't mean that the camera won't take good pictures.
So, if you decide to go for broke and try your luck one last time to REALLY BEND the arm to center it with the remaining highest point of the shoulder (if any remains), don't over do it! If you break this arm off of the counter assembly, the assembly will cost as much or more than the outer casing. Give this "one last try" some deep thought before doing it!
If the guide shoulder inside the outer casing is really this badly worn, there may not be much anyone can do about this except to sell you another expensive outer casing, and hope you profit from your mistakes and change the way you have been inserting the "Guts" into the outer casing: i.e., the camera's "guts" well centered in the mouth of the outer casing before pushing the "guts" directly perpendicular into the casing so that there will be no side-to-side slipping-and-sliding.
Top of Page1. Are you a member of the "wutdahekhapun" clan?
2. Flash doesn't fire with your camera? Grab someone else's strobe and try it on their camera
3. The camera still doesn't fire the strobe, sounds like you have somehow managed to mess up a great camera!
4. Check alignment, "coat-hanger" test, inspect and degrease the contacts; readjust the position of the spring steel flash fingers little by little very carefully, testing as you go; use a VOM if all else fails and you really want to know the bad news. Still nothing works, give up and enjoy the rest of the trip (Spring '91 article)
5. Flash goes off, but pictures have no flash fill! You may have "premature ignition"! Check alignment of flash pin assembly, or take a course in underwater photography.
6. Black pictures (or partially black)! Check to see if you have "glued" the shutter blades together with O-ring grease and spray cans of oil. Then use your new knowledge, and your camera and strobe, to make your own FREE shutter speed tester and flash synch tester. In one minute you will be able to find out if you have lost independent control over the shutter speeds, just forgot to set the shutter speed dial back to 1/60 sec. after the last rewinding of the film (dumb!), or accidentally moved the shutter speed dial during shooting.
7. What if the counter doesn't count? Do you feel like everything you touch mechanical sooner or later becomes damaged for some reason.
8. Perform the ball point pen test to be sure the counter still counts and that you haven't rusted up the gears.
9. Perform the ball point pen test to be sure the counter still counts and that you haven't rusted up the gears.
10. Inspect the counter engagement guide located on the inside of the outer casing for wear. If badly worn, inspect your pocket book for sufficient money to buy another casing.
11. Learn how to put the camera's "guts" into the outer casing properly so that you don't wear out or bend parts again.
Top of Page