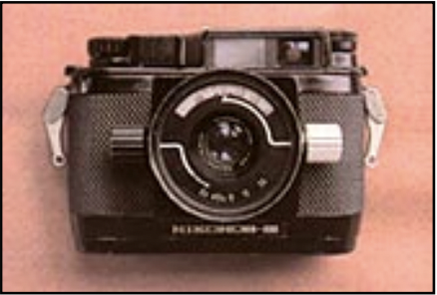
This NIKONOS WORKSHOP chapter begins the series devoted to the older styles of Nikonos cameras. So, let me begin again with my same old philosophy: "Every Nikonos camera built by Nikon has been a good camera. It's just a shame they had to sell them to humans!" If your intent in reading this and following chapters is to determine which Nikonos camera you want to buy, forget it! I don't compare one style of Nikonos to another; rather, I provide information strictly about a particular style of camera and what the human must know to maximize their use of that camera by providing proper use and maintenance techniques in order to prevent human accidental damage which is specific to that camera style. If you want to compare something, compare your current knowledge of your use of your Nikonos III to the information presented here.
The Nikonos III camera was manufactured by Nikon from 1975 through 1979. And just like its 2 previous totally mechanical Nikonos cousins, it too has retained a resale value nearly equal to, or in some cases, greater than its cost when it was originally offered for sale new.
This camera enjoys probably the greatest demand of all the 5 Nikonos camera styles manufactured to date. And why not since it's a common thing to hear "Oh, You flooded your Nikonos '#'! You should have owned a Nikonos III because it's easy to cleanup!", or you hear "the Nikonos III doesn't have electronics, so nothing can ever go wrong". Well, let's examine this camera and see just how "idiot-proof" it is in the hands of a human. And while we are doing this, don't forget that it, just like all of the Nikonos cameras, really is a good camera!
The waterproof casing (that which is intended to be exposed to the salt water) consists of basically two parts: the metal outer casing or "shell" and the plastic top cover or camera "head". The top cover will be covered fully in detail in the next issue.
Top of PageBeginning with the Nikonos III, the outer casing not only was lengthened but also took on a new appearance from its inauguration of new construction designs: the addition of (1) a standard 1/4 x 20 tripod screw mount socket in the base, (2) a completely new style of contacts for the electronic or bulb flash, and (3) a silver colored lens mount ring. So, what did those humans do to these new designs?
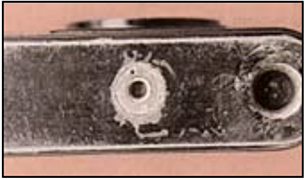
The only flash Nikon ever offered its III customers was one which required a flash bulb. Originally, it was the same style previously used for the Nikonos II (tray mounted to camera via screwing in the flash cable through a hole in the short tray and into the camera) except that the cable to camera contacts were changed. Later, Nikon changed its style of bulb flash to incorporate a full camera tray which finally had a tripod screw. Regardless, since Nikon didn't provide an electronic underwater strobe at all during the production years of the III, there were many eager do-it-yourselfers as well as manufacturers out there which were all too willing to fill this void. And all wanted to make use of this new addition to the Nikonos: the tripod socket! (photo 1)

This tripod socket is a completely separate piece of metal, either nickel plated brass or stainless, which is threaded on its outer side so that it can be screwed into the bottom of the aluminum outer casing. It is prevented from rotating by a single pin which is driven through one of the two holes at the mouth of the socket and into the outer casing.
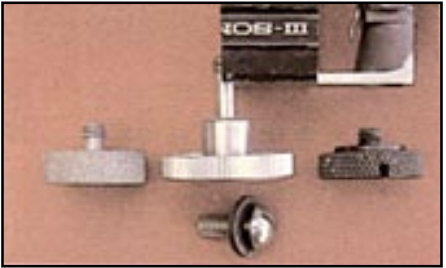
People who made their own tray, bought a non-Nikon tray/strobe combination able to use both a Nikonos II or III camera which used a washer as a spacer on the screw, or lost the original tripod screw and were forced to buy what ever "generic" was available at a camera store, soon found that they had made "big problems" for themselves.
If the screw was too short, overtightening caused the mouth of the tripod socket to break off. Too long, and the camera would not feel "secure" when the screw was tightened; thus, the human would continue to tighten the screw and drive it right through both the stainless tripod socket as well as the aluminum camera casing totally destroying the case forever!
Top of Page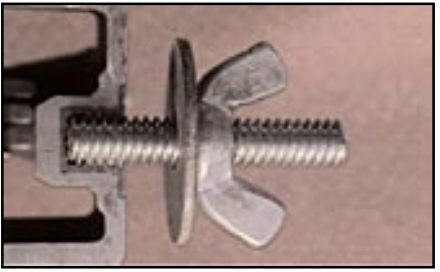
SOLUTION: Simple! Since the threads are a standard 1/4 x 20, you can get a long bolt (1 1/4 inch or so), a washer and a wing nut (galvanized) at any hardware store or (stainless) at a marine supply (photo 3). Stainless lasts longer, but plain ole galvanized steel will work for a long time if you keep it CLEAN and GREASED daily with a little O-ring grease (remember, it will get rusty in a few days). After cutting off the head, file the tip smooth. Now, screw this threaded piece FULLY into the camera's tripod socket-BY HAND ONLY!. Set the camera on the tray with the threaded piece going through the tripod hole of the tray, and secure everything together with the washer and wing nut (on the other side of the tray, of course!).
NOTE: Some trays have a tripod screw hole that is threaded so that the screw must screw through the tray and thus will not fall out when a camera is removed. This hole must be drilled out smooth with the 1/4 inch drill bit. Be sure that in doing so that there will be no damage to any of the structural features provided by the tray.
Then there are those humans who never take the camera off of the tray during the week of diving. And, since the bottom of the camera casing is thus prevented from being PROPERLY rinsed daily, the week of salt buildup begins to corrode the aluminum around the tripod socket (see Photo #1 a little more closely now). Then, one day as you are mounting the camera to the tray, the screw keeps turning and turning, and the next thing you notice is the whole tripod socket falls out of the camera, permanently!
SOLUTION: Obvious, isn't it! A little time to take the camera off of the tray for cleaning, or at least loosen it from the tray so that the fresh water can rinse away the salt water trapped between the camera and tray, OR, you can consider the outer casing as a "disposable" item and buy a new outer case (if such still exist) for well over $100.00 every few years.
Top of PageThe Nikonos III ushered in the era of a totally new style of flash cable connection: 3 very thin diameter metal "male" posts totally encased in plastic, and a plastic alignment key on the side wall. Correspondingly, the housing for the flash cable's "female" contacts was also made of plastic.
As before, those people who left the camera mounted to the tray during their week of diving were also the ones who typically left the flash cable connected to the camera. Not only was corrosion occurring to the tripod mount, but so was the flash cable connector corroding and "freezing" to itself as well as corroding away the threads of the outer body where the connector was screwed into.
These 3 thin metal male posts along with the plastic alignment key were no match in strength to a frozen flash connector. After the week of diving, the screw-in threaded flash mount which used to freely rotate around the flash cable shaft now is frozen to the shaft from a week of neglected salt buildup. So, when you go to remove the flash cable, as you unscrew the rotating threaded mount, the entire connector turns and breaks not only the 3 thin flash pins in the camera but also breaks the plastic connector housing of the cable (photo 4)! End result: damage to both the camera and flash, and nothing you can do now to fix it for use again during the remainder of your dive trip. They both must be professionally repaired, and you know what that means! Big bucks out of your pocket!
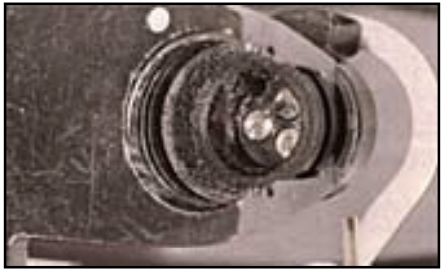
SOLUTION: Maybe, JUST MAYBE, after diving and before you head for the shopping, the bar or other entertainment, you could find time after your fresh water cleaning of the camera to then remove the flash cable from the camera (after rinsing, not before!). This would at least get the cable safely removed from the camera before everything froze up. Then, before the next day of diving, you can safely and freely rotate the threaded mount around the cable shaft breaking up any salt formations that may not have been properly washed off the day before. Then clean off any salt residue along the cable shaft with something like a toothbrush, and add JUST A LITTLE O-ring grease along the metal cable shaft (not on or near the flash contacts!) and continue rotating the threaded mount until you feel the grease is evenly distributed.
Now, the tough part. After using the toothbrush on the threaded part of the flash cable, use the toothbrush in the threads of the flash port of the outer casing. But remember, both times you are near the actual FLASH CONTACTS. Since you have been using this brush on other parts that have been previously greased with O-ring grease, there is a good possibility that some grease is now on the brush. And, since grease will prevent proper electrical contact from being made, I strongly suggest that you use soap and water to clean your toothbrush before cleaning anything near the actual flash contacts themselves! "Comprende amigo"!
Note that the flash sync cover is small and easy to lose. A good tip is to store it in a spare plastic 35mm can to make is easier to keep up with. Also adapters for syncing a normal flash for above water use were made and are easy to find used examples of.
Top of PageThe actual reasons for adding this ring to the front of an outer casing for an underwater camera, where previous models of the Nikonos didn't have it, may never be known. However, this addition as well as one on the plastic head (discussed later on) appear to have been added in an attempt to provide replaceable parts in areas that receive additional wear. Regardless, the more parts there are in any gadget, the more responsibility the diver/photographer has for proper maintenance as well as exercising cautions during use! So, where's the problem? Basically, it is the lack of understanding of what you have got in the way of your camera and its construction, or what I call the "between your ears" problem. I've never seen this information in print, in any form by any author!
For the lens mount ring itself, there are two styles. Both are machined, but one is made of stainless steel (older style III's-very shiny) while the other is a brass base metal with a dull gray plating (newer style III's, all IV-A's and V's). If you are asking yourself at this point is one style better than the other, the answer is NO!
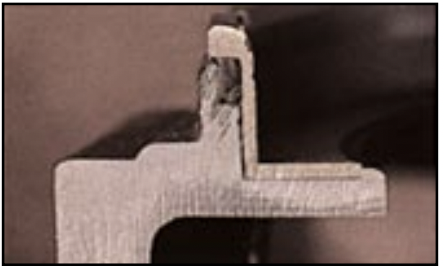
The outer casing is, of course, a metal casting which has a smoothed stepped-wall orifice to allow for the addition of the metal lens mount ring to be installed (photo 5). Since this ring is installed onto the outer face of the casing and therefore exposed directly to water, it to must be O-ring sealed. The installation is completed by securing the ring in place with three small screws.
Top of PageAs you can see, where the lens mount ring interfaces to the outer casing, there is a gap between these TWO DIFFERENT METALS (aluminum casing, and either stainless steel or a brass base metal) for saltwater to collect. Remember about bi-metal electrolysis? If this means nothing to you, then think about food trapped between your teeth and tooth decay!
Now, by adding the lens to this area for diving, the lens itself extends beyond the ring (some lenses more than others) and further allows for more salt water to be retained for a longer period of time in contact with the main casing/ring interface. Longer contact, more electrolysis: more electrolysis, more metal corrosion.
Unfortunately, this very thin metal lip of the main casing is all that there is to provide for an O-ring seating wall for the lens mount ring. When the metal of this lip becomes corroded and breaks off (see photo 5 closely), all you do is replace the whole outer casing (part in excess of $100.00); it can not be repaired! Unfortunately, people don't realize the destruction they have caused until the camera "all of a sudden floods for some unknown reason". Now, in addition to the outer casing replacement, you have the added expense of a flood cleanup and more parts ($100.00, $200.00, who knows how much).
SOLUTION: Very simple. Don't let the WET saltwater dry out before you can wash the camera/lens off with WET fresh (or at least "fresher") water. As I keep explaining time and again, immediately after the first dive of the day, keep YOUR equipment continuously wet in YOUR own private small bucket of salt water until YOU can properly clean YOUR equipment in YOUR fresh water back at YOUR room or home. For the complete information on these techniques and the reasons why not to use the common "rinse tank", chemicals and other "voodoo" methods, I recommend that you get a copy of the Nikonos Workshop Chapter 3 (Fall, 1988) from Ocean Realm Magazine (Call them! They put their number in the front of this magazine for some reason.)
But, if you are now seeing a white residue at this outer interface of the ring, DON'T DIVE THE CAMERA until you get it serviced. No no, don't start spraying all kinds of well intention junk all over the camera, and for heaven's sake don't use a pocket knife and try to scratch out the corrosion you can see! Get the camera professionally serviced. It may be a harmless residue or the tip of the iceberg of pending doom.
Top of PageNext, if you have ever flooded your Nikonos III in the past and spent all that time to clean it up, I am absolutely certain that you have forgotten to properly clean the lens mount ring area.
"Not me!" you say. "I wipe the water from the silver colored ring, and thoroughly dry out the casing by itself! I know how to clean the camera properly!" Well, if this is you, or if you have ever bought a used Nikonos III and wondered why someone would sell such a jewel, read on.
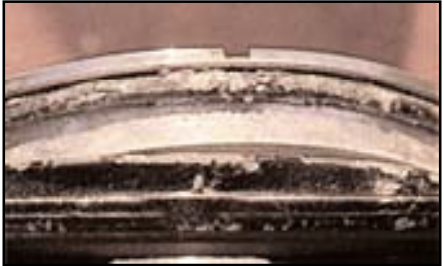
Unfortunately, when a Nikonos III floods, the main casing is easily filled with saltwater. Unknowingly, the saltwater enters from BEHIND the O-ring sealed lens mount ring and is trapped in between the main casing and the ring (photo 6). This same trapping of salt water can also occur when it appears that only the lens (to the exclusion of the camera body) was flooded!
Since you only see the outside of the ring, you naturally assume that by cleaning off the surfaces that you can see that you have thoroughly cleaned and dried all aspects of the casing, and then turn your attention to the rest of the camera for cleanup. Unfortunately, this is a dumb, but all to common, mistake that nearly all Nikonos III owners make. The correct approach would have been the Solution #1 procedure below.
Never knew about Solution #1? Then don't be surprised when, months later, you consistently see (at first) small amounts of water which has mysteriously entered into the camera after each dive. Later, more and more water comes in from this mysterious source, even though you keep buying more new O-ring, cleaning them after each film change and re-greasing them.
Using your Nikonos 35mm lens as a magnifier, inspect the lens mount ring in the area between the flat of the ring (where the three screws go) and the little black metal area (the main casing) for signs of "white" residue in this interface. If present, what you have under that shiny metal ring now is a casing that has been allowed to corrode into uselessness, and typically only a complete replacement is the only repair option left. Follow Solution #2 below.
Top of PageNOTE: After the following disassembly, you will not be able to safely reuse the O-ring and, therefore, will not be able to safely use the camera for the remainder of your trip. The O-ring will have to be professionally replaced and the whole camera system pressure tested in water to verify the water tight capability.
The first known flood for the camera: If you are certain that this is the first flood ever for this camera, then the lens mount ring can be removed easily. Using a jewelers Philips screwdriver WITH A PROPER SIZE TIP, remove the three small screws on the front of the lens mount ring. Now, insert your fingernail into the interface between the ring and the main casing and start lifting out the ring. Lift a little, move to another spot, lift a little, and so on. The object is to lift off the ring UNIFORMLY, not peal it off like a beer cap. If you peel it off, you will break the thin O-ring wall of the main casing for sure and convert the casing into scrap suitable for deposit in your local aluminum recycling machine in the parking lot of your favorite grocery store. Also, don't use a screwdriver to help pry off the ring: this will for certain damage the thin lip!
Once off, you can now dry the area underneath the ring as well as that part of the main casing. You will also note that there is an O-ring whose diameter is as thin as that of a pencil lead and that this O-ring's faces are now flat as pancakes. Now, I hope you will understand why I first said not to try to replace it and re-dive the camera.
CAUTION: if the screws are too tight to remove by hand, use a pair or pliers on the handle of the screwdriver. DON'T use the pliers (or a hammer) to beat the screwdriver into the head of the screw if the screw head becomes deformed: this can and will cause the whole outer casing to be bent and no longer usable for anything but an ashtray. Also, if the screw head starts to strip, stop everything and let some professional try his luck. It's cheaper to blame him if something goes wrong, goes wrong, goes wrong.....
Camera with continuous small water leakage and "white" corrosion present: Don't dive the camera.......unless you are willing to pay good money for film developing of photos that were improperly exposed due to damaged shutter speeds from the "just a little water leakage" that you constantly had to mop up, or are willing to damage a good lens. Also, in this case don't even attempt to try to remove the lens mount ring yourself! It is welded in place by the corrosion, and it is necessary now to use metal tools to remove the ring. Let only an experienced professional service facility try their luck in safely removing the ring (if such is possible), cleaning the corrosion to the outer casing, and replacing the lens mount ring and O-ring just to see if the outer casing can be saved. Remember, this is a lot of work by someone, and there ain't no guarantee of success!
Top of Page1.The metal Nikonos III tripod sockets are not made from Army surplus Sherman tank metal. If you use a tripod screw through the flash tray that is too short, it will break the head of the socket; too long and you will drive the screw right through the socket and into the casing destroying it forever. Quit tripod-screwing around; and make your own and use it correctly.
2.A flash cable connector left mounted to a Nikonos for the whole week of diving is a certain way to break the flash pins of the camera as well as the end of the strobe cable when you go to disassemble the cable from the camera. Daily removal of the connector from the camera (and a little cleaning) can save a costly removal of money from your pocket.
3.The shiny silver colored lens mount ring on a Nikonos III is more than just another pretty face. But just like every pretty face, if you neglect it, it will destroy your body and your whole photo/dive trip. Proper understanding and a little pampering here will go a long way.
Top of Page