Sir Isaac Newton discovered and explained the laws of gravity. Sir Isaac Murphy invented ways for gravity to be combined to little dumb human mistakes to allow water drops to fall into holes and seams of a Nikonos III and ruin it.
Sir Isaac Murphy's Law #IIIa states that "if a drop of water can fall off of a Nikonos III camera, that it should fall into the most damaging of areas within the camera and must do so without anyone realizing it had fallen". Law #IIIb states that "Law #IIIa is a thousand times more likely to happen for each accessory you have on a camera and camera tray".
BIG mistakes like a full flood, and you don't have to have an apple hit you on the head for you to realize that you have had a problem that will require professional servicing IMMEDIATELY. But it's those LITTLE "dumb mistakes" which fall into the category of "I didn't see any water in the camera today: therefore, I have not caused any damaging problems to the camera". That is, not until tomorrow or the next day when EXPENSIVE DAMAGE HAS OCCURRED and the camera quits. And, because that damage MAY now cost more to fix than the camera is worth, you don't repair it (my loss of making a living), but go and buy another camera (your loss of money). These "little" mistakes covered in this article occur primarily during the opening and handling of the camera after diving. (Flooding of the camera will be covered in a later issue.)
"Holes" like the one for shutter blades, or where parts are joined together, aren't really "holes", are they? Let's be honest about it. Holes in YOUR camera aren't really holes to you. No, of course not, not until that day when a drop or two of water hits the camera. If you can wipe them off, your camera "ain't got no holes in it"! But, as you are wiping them off, you see those drops slowly sink into the camera where you can't get to them to wipe them off. It's not until then that all of a sudden you realize that your camera DOES, in fact, have holes in it, and that these holes now have water in them.
Top of PageIf you examine any camera closely enough, you will find that all cameras have holes, believe it or not. They have to have these "holes" simply because every camera is made from a number of parts. And, every time two parts are screwed together, or one part moves around or through another part, there must be a space (be it ever so small) between these two pieces.
A Nikonos III is no exception. Simply put, the camera has to have a number of userrequired capabilities, and all must be placed within a specified size of the camera. So, to do this, operations which actually function within the camera's mechanical "guts" must go through holes to the outside of the "guts" in order that they be started or stopped, or because of space requirements. Where are the holes: at the top, bottom and sides of the camera!
I will take you hole by hole, first explaining the mechanical operations going on in each area. If damaged, I think you can figure out what effect it will have on the camera's overall functionality. Anyway, the "holes" I will talk about are those I consider to be the more important "holes" because of the mechanical operations performed, the ease (and frequency I see being sent in for repair) of damage which are caused by a single frequent human mistake: they forgot about Sir Isaac Murphy's Law.
Top of PageEveryone wants the counter to automatically count the frames when the camera is loaded with film and closed for use, and to automatically reset itself when the camera is opened to change the film. Nikon could have provided you something like a windup key to do this, but people would just probably loose the key or forget to wind the camera. And even though a Nikonos III did weird things like go underwater that its land use only counterparts couldn't do, this was just too weird to make the user windup their camera.
Thus, like a land camera, when the back door was closed or opened, the frame counter started and returned to zero respectively, automatically. For a Nikonos III, this equivalency occurred by placing the "guts" into, and removing them out of, the outer casing.

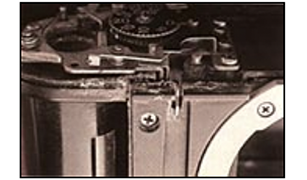
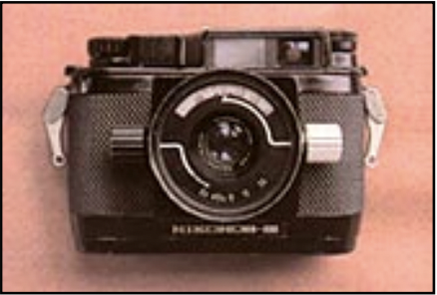
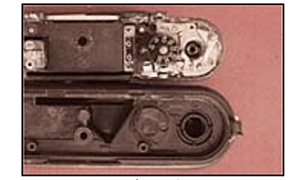
This feat of automatic genius was achieved for a III by having the counter activating linkage arm (photo 1) extend from the counter assembly (inside the camera) through a hole to the outside of the "guts" (photo 2) so that, when the "guts" were completely slipped into the outer casing, a "gut's guide" (Sorry, but what else would you call it?) on the inside of the casing would not only guide the "guts" into the casing but would also push up (and activate) the counter's frame counting linkage arm and make the counter count. If this doesn't make any sense to you, then take a ball point pin and push up the little linkage and watch the counter go round as you trigger and cock the camera....let go with the ball point, and the counter returns to zero
Top of Page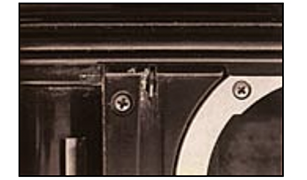
Anyway, that's the mechanics. Now, here is the "dumb little human mistake" for this area. Since the hole for the linkage is just under the head where the wet O-ring (after diving) is (photo 2), it is extremely easy for that one drop of water to fall off (with gravity!) the wet O-ring, into the hole and onto the linkages. And, of course when this drop goes into the camera, it no longer is on the outside of the "guts" for you to see to warn you of a possible problem. It's not until a couple of days later that the counter won't count, or return to zero, that you realize that there has been a problem. How do you avoid this problem? Simple! Open the camera up-side-down. That way, the water drops which collect in the O-ring channel and on the O-ring itself will fall....with gravity....into your lap or onto the table, and not fall....with Murphy's law of gravity....onto the "guts" and into this hole.
"Oh, you will just wait until the outside of the camera is dry to open the camera!", you say. Another "little" dumb mistake since water can stay in the O-ring channel for up to 7-10 days after the last dive even though the outside of the camera is completely dry. The camera itself must have been opened up to allow the O-rings and channels to also dry! So just get into the habit of always opening a Nikonos III up-side-down at all times. A "dry and safe to open" Nikonos III is like an unloaded gun: there ain't no such thing!
A few more things you should know about this "little" counter assembly. You may remember from previous Nikonos III articles that there are 4 distinct varieties of Nikonos III cameras. During these variations, Nikon used 2 totally different types of counter assemblies, and they are not interchangeable! Style #1 was used for nearly 75% of production; Style #2 for the remainder. Because of the ease in which a little mistake would cause damage to the linkage and other areas of the counter assembly, this part frequently has to be replaced (expensive!). If there is any question in your mind of a drop, leakage or a flood, get the camera serviced IMMEDIATELY (see next paragraph as well). THERE AIN'T A BIG DEMAND FOR NIKONOS III DOOR STOPS RIGHT NOW.
For more on this topic of different versions of the Nikonos III see:
Next, all of those other parts you see on the counter assembly (photo 3) ain't there just to make it look expensive. They do little things like let the shutters open and close, the film to go forwards and be rewound, and hold other gears in place. So, that little hole that can allow a drop or two of water to enter into the camera at the counter assembly can mess up the entire camera's operations, not to mention it counting 1...2...3! Most of these parts are assembled with rivets: thus, they can't be taken apart for cleaning if they get corroded. This usually means that it's all functional or it's not.
Top of PageOn a scale of 1-10 of most frequent human mistakes (and repairs), if the above is a #10, this one is a #9.99!
Remember from photo 1, the counter assembly spans the width of the camera. Thus, the drops of water falling off of the O-ring (described above) from the front of the camera (photo 1) is but one source of damage to this assembly. Drops of water falling off of the Oring from the back side of the camera (photo 3) will also occur and get into the area where the head (one camera piece) joins to the top of the main guts of the camera (another camera piece). And, it happens from opening the camera in the old way: right-side-up.
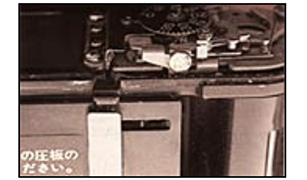
The mechanics of how the damage occurs is somewhat long winded. What happens when opening the camera in the "old way" (extracting the camera's "guts" upwards out of the casing after diving) is that water falls downwards with gravity (it has to! Nikon forgot to change the laws of physic when inventing Nikonos cameras). Water falls onto the film plate thumb latch, then through its hole and up under the head (which is foam lined to keep out stray light) (photo 4).
Of course this light-trap foam, which is glued onto the camera's head, gets wet (like any household kitchen sponge will). But what you don't realize is that this foam runs quite a distance along and under the head, extending far enough to be along side the gears and linkages mounted on the back side of the counter assembly. The water soaks into and all along the light-trap foam, thus allowing for that hidden, and continuous, bathing of the gears and linkages on the back side of the counter assembly with salt water.
If you had left the camera in "R" (rewind) from the day before, today you would find that the shutters may not function, the film won't advance, and the counter won't count. In short, the camera is dead in the water!
For a Nikonos III, this is the worst possible area of the camera for damage to happen, outside of it being stolen or run over by a Mack truck. Why: because these gears and linkages control major camera operations, and if damaged, nothing photographically will work on a Nikonos III. Why: because these linkages are put together with a ....rivet, and you know what that means. Why: the whole part may not be cleanable, and replacement parts are scarce. Why? Because there is no reason for this to have happened if you had only opened the camera up-side-down.
Top of PageThere are two shutter curtains (blades), and each is controlled by its own shutter release linkage. The second curtain always closes (releases) mechanically at the same time. Therefore, every selection of shutter speed must be made by controlling when the first curtain opens relative to the constant closing of the second curtain. To accomplish the control (timing) of the first curtain's opening, Nikon used two timing cams, one inside the camera and one outside (photo 5). The nickel-size cam you see on the bottom of the outside of the camera communicates to the cam on the inside via a linkage pin that extends from the inside to the outside of the camera through a HOLE. And, of course this linkage is mounted to the whole lower unit of the camera with a (let's say it all together) rivet. I only mention all this stuff to try to blow your mind into thinking I know what I'm talking about, and to try to impress upon you the seriousness of what I'm about to tell you about this hole and a drop of water.
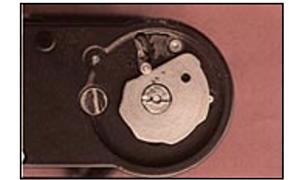
Remember while you open this camera up-side-down as explained above, that this hole will now be facing up to you. And, according to "Murphy's Law of gravity", every drop of water possible will fall directly into this area of the camera, even if the drop is a million miles away. As a matter of comparison, the size of the drops of water falling off of your face and hands (and that from people who want to look over your shoulder) and those falling from the lifters are HUGE spheres of damage to a camera compared to those clinging to (and don't usually fall off of) the mouth of the casing at the O-ring seat.
Top of PageWhile you can't do anything about those small droplets of water on the mouth of the casing until the camera is fully opened, you can be sure that your face and body (and that of onlookers!) are dry and the lifters are free of trapped, visible water. (Note: Those who dive with a strap of ANY kind mounted to ANY Nikonos camera are asking for serious trouble when it comes time to open the camera to change film. These items trap lots of water.) The tiny droplets clinging at the case mouth typically will not fall off unless you vigorously shake or beat the casing. And, if you were curious, you can take it from me that beating the side of a III casing makes a lousy bell!
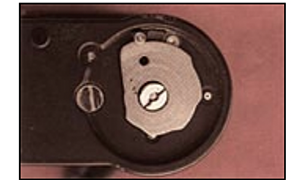
So, just in case I forgot to tell you about all of the possible hazards and sources of water such as not open anything while the boat is under way (waves, salt spray, dropping the camera, or the rinse tank falling over and the guy next to you spills his "long-neck" of sparkling water onto you and your opened camera, etc.), I recommend that you have the shutter speed dial set to "B" before opening the camera. Doing so will block as much of this hole in the bottom of the camera as is humanly (and mechanically) possible (photo 6) just in case YOU ARE IN A HURRY TO CHANGE FILM and the unexpected happens. You really should wait to open the camera until you are in a dry, calm and controlled area, and then follow the procedures listed below.
Top of PageThese holes, while obvious as to their purpose, are none the less holes for water to be carelessly dropped into (photo 3). True this is a somewhat rare occurrence when compared to the other two common problems talked about so far. But, if this should happen, I really hate to tell you the following. If professional servicing to correct the damage can not be effective UNLESS complete disassembly and dismounting of the entire film advance sprocket itself is required, then the chances of complete disassembly by anyone on the face of this earth is about 99+% against you! Internal parts literally become welded to the main camera frame from corrosion. And typically the labor to strip all the good parts off of your camera and rebuild them around another new frame with a functional sprocket is more costly than the cost of the frame. What this all means is "better find another camera".
How do you keep this from happening? There ain't no magic tricks other than those already mentioned above. Just be sure to open the camera up-side-down, in a dry area and with a dry body, and remove those accessories from around the camera. As mentioned, it is a rare occurrence, but when it has happened to the extent of serious damage (excluding a full flood and no followed attention given), it has occurred due to falling water drops that "must have been trapped in a strap because it kept falling onto my camera no matter how I held it. I thought I wiped off all the water, but I guess not". Ever heard this one before?
Top of PageThis is one of the more infamous "holes" in that damage can occur to more than just the flash contacts: it can damage the shutters! From photos 7 & 8, you can see that the three flash contact nuts, with their respective wires attached, stick their heads out through the holes in a thin plastic cover. In fact, water can leak into the camera from anywhere around this plastic cover.
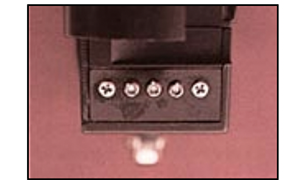
Holes are holes, and water drops don't care how large or small they are. At first glance, this area of the camera appears to most people to be enclosed and harmless if drops were to fall onto the contacts and quickly wiped of. No damage could possibility have occurred, right?
Top of Page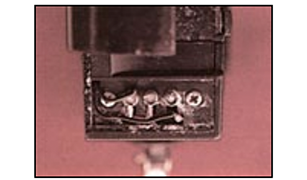
Right, except for the fact that electrical current is flowing through these wires, which merely caused your flash not to work (or constantly fire without triggering the shutter). Right, except for the fact that the wires are being oxidized (burned out) little by little as are the actual contacts, finally preventing the strobe from firing all together. Right, except for the fact that located immediately behind the contact plate are the shutters! (photo 8.)
It's easy to understand that if your shutters get damaged, the cost of your repair (what ever it is) will be high. But these little wires should be cheap. Well, the wires are cheap, but to install them requires labor to disassemble about 75% of the camera, and that ain't cheap!
How does damage happen? Wire damage: a single drop of water from a wet hand, or opening the camera the way you have always done it ...right-side-up...and drops falling off of the camera's head or off of other camera accessories. The more the water drops, the more water available to seep around the flash contact plate and into the camera to reach, and damage, the shutters themselves. Preventing this is simple: open the camera up-sidedown.
Open it up-side-down! End of article.
First, there are a few considerations that must taken into account before we are even ready to consider opening the camera to change film. These were all discussed in my Fall 1990 article in Ocean Realm. Briefly, repeated, remember that you have already turned your shutter speed dial to "R" and have re-cocked/locked the trigger for a camera-safe surfacing and entering the boat. Once on the boat, the film has been rewound following PROPER procedures. And lastly, the shutter speed dial has been turned off of "R" to some shutter speed, and the trigger triggered three times to re-engage the gears in the camera (very important to do before opening the camera-see that article!)
1. I strongly recommend that you take the camera off of the tray, especially if you have one of those trays mounted with a handle, light meter, and other accessories. The more accessories (including the tray itself and any optical finder on top of the camera), the more areas there are for water to be trapped and available to fall into and onto an opened camera. This may also mean undoing the flash cable as well just to get the camera away from the tray (sorry).
Get rid of neck straps, wrist straps, ropes, old belts and "do-dads" that you have added to the camera so that the camera can't accidentally be lost (or be dumped from yourself in times of diving emergencies!). These items trap water as well.
2. Blow off excess water trapped around and under the rewind crank, trigger (and thumb assist is so equipped), and lens. Blow off ONLY WITH YOUR MOUTH, not with a scuba tank! Dry your body and hands, and find a dry place to open your camera.
Top of Page3. Since gravity is every where, first begin opening the camera by pointing the lens downwards, unscrewing, and pulling the lens off slowly DOWNWARDS. Set the lens facedown off to the side (pick a smart area to lay it!). Towel try the silver colored lens mount ring on the front of the outer casing (of course you have kept the camera face-down while you set the lens off to the side)
4. Now trigger the trigger and this time leave it extending out. This will provide the camera's head with a "tripod" so that the camera is more stable and less likely to fall over during and after opening. (Note: there is a drawback from this technique. As I mentioned above, when opening the camera to have the shutter speed dial set to "B" IF YOU ARE IN A HURRY TO CHANGE FILM so that the cam will block the hole on the bottom of the camera. Well, with the trigger triggered and left outwards, the cam will no longer block the hole. Knowing this, I personally still open the camera using the extended trigger. This forces me to find a dry controlled area, to take my time, and to exercise extreme care not to let anything or anyone reach over MY camera for anything!!!)
5. Turn the camera up-side-down (that's right, this means the camera's head is pointing down on the table and your are looking at the bottom of the camera!).
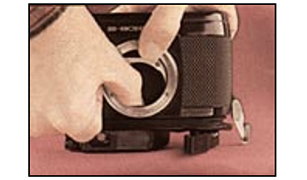
6. (Remember, everything is up-side-down from here on in, and will sound a bit weird to you. After a couple of readings, it should make sense, I hope.) Holding the camera's body up-side-down in your left hand and left thumb over the edge of the lens mount ring for support (visa versa if you are left handed), place your right DRY thumb into the lens hole and downwards onto the center of the frame and PUSH downwards and outwards the "guts" out of the outer casing just enough so that the casing is freed from the O-ring compressed seal (photo 9). (If you just gotta use those darn lifters, then rest the camera upside-down on a table and use them just a little to just open the O-ring seal. I really wish you wouldn't use the lifters because of the problems explained in the Summer Issue!)
Top of Page7. Holding the lifters along the side of the casing, lift up the casing off of the "guts" and set it off to the side (up-side-down of course!). Before picking up the "guts" to change film, check around the O-ring area for water drops, and remove any big ones that you see.
8. Pick up the camera, head still up-side-down, and tilt it about 45 degrees to allow any water that wants to drain, to drain. Then, reload the film (still up-side-down as best you can).
9. Close the camera up-side-down as well. But, don't close it up while it is on the table; hold it in your hand (the table is too hard and you could put undo strain on the trigger and break something) and squeeze the "guts" back inside the casing. On closing, don't be surprised to see a bead of squeezes-out water falling out of the O-ring channel!
10. Reinstall the lens up-side-down (because its O-ring is still wet), and the camera is now sealed and ready to go. Just put the camera back onto the tray, remount the flash, and go diving.
11. Throughout this while awkward procedure, gravity has been working for you, not against you.
OK, now for the SUMMARY
1. Ever heard of Sir Isaac Murphy?
2. Remember that gravity is always present, and water drops always fall in the direction of gravity.
3. Underwater photography doesn't have to be a rich-man's sport (of having to buy new equipment after every dive trip) unless your nickname is "Murphy". Also, Orings and channels stay wet with water for up to 10 days unless the camera itself is opened to dry, even though the camera's outside appears to be dry.
4. All cameras have holes and openings. It's called manufacturing (putting parts together).
5. Air in a camera's holes: no problem. Water drops in a camera's holes: big problem
6. Know your camera and the contraption it is mounted on; know water and gravity; don't mix them.
7. Always open the Nikonos III up-side-down, off of and away from the tray and its accessories, in a dry controlled area and take your time.
Top of Page